

Snake plants (Sansevieria trifasciata) are beloved indoor plants known for their resilience, low maintenance, and air-purifying abilities.
Despite being nearly indestructible, even these hardy plants can run into trouble.
If your snake plant is struggling, this guide will help you identify the most common causes of a dying snake plant and nurse it back to health with proper care.
Early Signs Your Snake Plant Needs Help
The first step in reviving your snake plant is recognizing the signs of trouble. Common problems include:
- Yellow leaves: A sign of improper watering or fungal infections.
- Mushy leaves: Often caused by overwatering or poor soil quality.
- Brown tips or patches: Could indicate low humidity, physical damage, or fungal diseases.
- Drooping leaves: Caused by a lack of water or improper lighting.
- Wrinkled or shriveled leaves: A sign of insufficient watering or dry soil.
If your plant shows these symptoms, don’t worry! With a bit of effort and the right balance of care, your snake plant can recover.
Step 1: Address Overwatering
An overwatered snake plant is the most common cause of problems. Excess water can lead to mushy or yellow leaves and signs of root rot, which occur when the plant’s roots sit in soggy soil.
How to Fix It:
- Remove the plant from its pot and inspect the plant’s roots—healthy roots are white and firm, while rotted roots are dark and mushy.
- Trim away any infected parts with sterilized scissors.
- Allow the remaining roots to air-dry for a couple of days to prevent fungal diseases.
- Repot the plant in fresh soil, a cactus or succulent well-draining soil mix works best—and choose a pot with drainage holes for good aeration.
- Water sparingly, only when the soil surface is completely dry.
Pro Tip: Avoid using regular potting mix, as it can retain too much water and worsen the issue.
The snake plant usually needs watering once a month!
Step 2: Fix Underwatering
A lack of water can leave your snake plant with shriveled leaves and slow growth. While snake plants don’t need much, they do need enough water to stay hydrated.
How to Fix It:
- Soak the soil thoroughly until water drains from the bottom of the pot.
- Check the water level weekly, and water again when the surface of the soil is completely dry.
- For best results, establish a consistent watering schedule.
Snake plants are slow growers, so you may need to wait a couple of weeks to see improvements.
Step 3: Adjust Lighting Conditions
Snake plants are tolerant of low light, but insufficient light can lead to drooping leaves and poor health.
On the other hand, too much direct, bright light can scorch the snake plant’s leaves.
How to Fix It:
- Place your plant in bright indirect sunlight or near a window with natural light filtered by a sheer curtain.
- If your home has low light conditions, consider using artificial lighting to supplement.
- Rotate the plant every few weeks for even exposure to light.
Step 4: Boost Humidity for Better Growth
Snake plants are highly adaptable, but creating a more humid environment can support recovery and encourage healthy growth, especially if your home has very dry air.
While snake plants don’t require high humidity, adding a bit more moisture can prevent issues like brown tips or wrinkled leaves.
How to Increase Humidity:
- Use a Humidity Tray: Place your plant on a shallow tray filled with water and pebbles. Ensure the bottom of the pot isn’t touching the water to avoid soggy roots.
- Mist the Leaves Occasionally: Lightly mist the leaves using distilled water, particularly during the growing season or in dry environments.
- Place Near Other Plants: Grouping plants together creates a naturally humid microclimate.
- Use a Humidifier: A small humidifier can maintain optimal humidity levels around your snake plant, especially during the winter months when indoor air tends to be drier.
Pro Tip: While boosting humidity is helpful, avoid going overboard. Excess moisture in the air can encourage fungal diseases or attract spider mites. Always strike the right balance to support your plant’s recovery.
Adding just a touch of extra humidity can improve overall health and help your snake plant thrive in the long term!
Step 5: Inspect for Pests
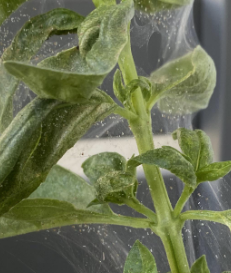
While snake plants are generally pest-resistant, they can occasionally attract spider mites or mealybugs, especially under stress. Signs of pests include fine webs or white, cottony spots.
How to Fix It:
- Wipe down the parts of the plant with a damp cloth to remove visible pests.
- Spray the leaves with insecticidal soap or a mix of neem oil and water.
- Repeat treatments every few days until the signs of pests are gone.
Step 6: Refresh the Soil and Pot
Over time, compacted soil can block airflow and water drainage, leading to stress. Refreshing the soil and repotting the plant ensures good aeration and a healthier environment for your snake plant.
How to Repot:
- Choose a clay pot or a pot with drainage holes to prevent waterlogging.
- Use a succulent potting mix for well-draining soil.
- Carefully remove the plant, shake off old soil, and replant it in fresh soil.
Step 7: Prune Damaged Leaves
Pruning encourages new growth and helps the plant focus its energy on healthy parts.
How to Prune:
- Use sterilized scissors to cut off dead leaves, brown patches, or heavily damaged areas at the base.
- Watch for new leaves sprouting as the plant recovers.
Step 8: Create the Ideal Environment
A healthy snake plant thrives in the right conditions:
- Keep it in a stable temperature range (60°F–85°F), away from extreme temperatures or drafts.
- Maintain high humidity using a tray of water and pebbles or a humidifier.
- Avoid fertilizing a stressed plant; wait until the next growing season (early spring or late summer).
Whether it’s overwatering, lack of water, or insufficient light, identifying the root cause is the first thing you need to do.
By following these effective measures, you’ll soon enjoy a healthy snake plant with lush, vibrant growth.
Have you got a Night Owl Snake Plant? Read my post on Night Owl Snake Plant Care – All You Need To Know.